
![]()
Ugh – not another PowerPoint blog. You’ve created and given hundreds of presentations over the years, and you already know everything you need to know about PowerPoint… right?
Prepare to be amazed. You might think you have your tool belt full of PowerPoint tricks, but there’s always room for one more. It’s time to pump up your presentations, wow your audience and gain Super User status among your coworkers with these five fantastic PowerPoint secrets.
Secret #1: Black Out
Is your audience looking blankly at the screen displayed behind you, seemingly lost in space? Give them a visual shake by blanking out the screen.
While in Slideshow view, press the period key (.) on your computer, and the screen you are projecting will go black. To return to your presentation, simply press the period key (.) again. Alternatively, you can press the W key to make the screen white, and press W again to return to the presentation.
This simple action will shift the attention back to you as you speak and ensure that the content being displayed isn’t lulling your audience to sleep.
Secret #2: Doodle
Did you know that you can draw on your PowerPoint during a presentation? I just found out about this secret feature in PowerPoint, and I can’t tell you how much I love it.
As you are displaying content in Slideshow view, press Ctrl + P, and the pen tool (which appears like a small dot) will appear. Click and draw on the slide with your mouse to draw directly on the slide. Press the E key to erase what you have drawn, and press either the A key or Ctrl + H to hide your pen.
This powerful doodling feature will allow you to easily highlight content during a presentation. It also gives you a chance to bring a wandering audience back to life as you create something new right before their eyes. Think of it as a PowerPoint magic trick – no top hat or rabbit required!

Using the pen tool allows you to draw directly on your presentation.
Secret #3: Line Up
Having text, images and content aligned makes a presentation look professional, and PowerPoint has made it easier than ever to center or align content with a few simple clicks.
While in Normal view, right click on the area off your slide (but not in the sidebar) and a drop-down menu will appear with an option for Grid and Guides. Click on this, and a dialogue box will appear, allowing you to modify how the grid and guides are displayed in your work space. Click the Display grid on screen checkbox to see dotted lines on your slides, which will assist in creating a clean, organized presentation. It’s a thing of beauty!
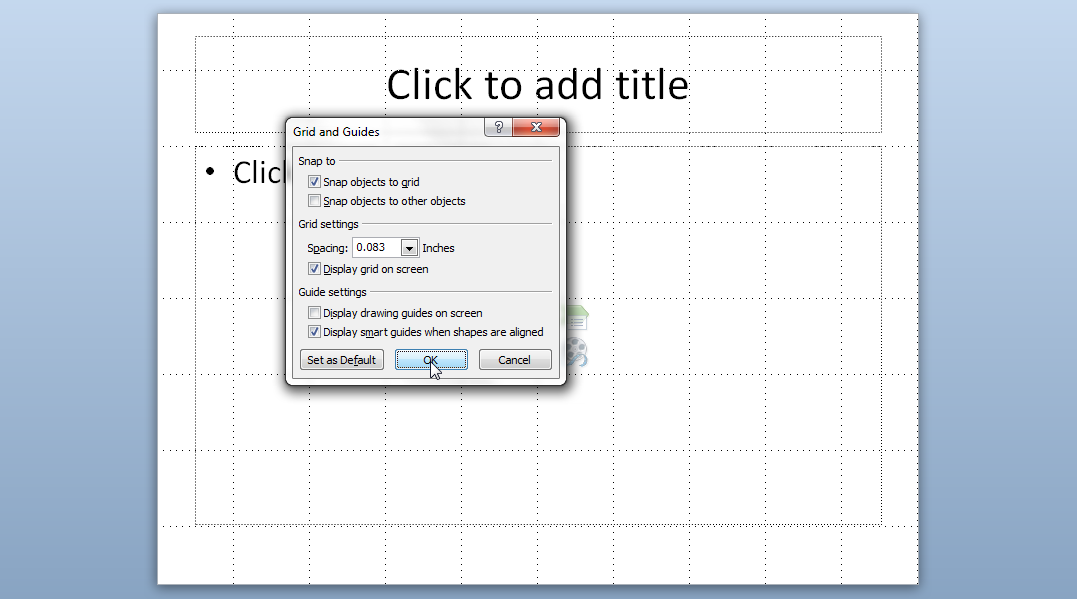
Grid and Guides dialogue box provides options to better organize and align content in PowerPoint.
Secret #4: Screen Capture
Need to snatch an image of your screen to place in your presentation?
Go to the Insert tab at the top of the application, and you’ll see an option for Screenshot. All the programs you have open (that are not minimized to the toolbar) will be displayed. Simply click on the program of your choosing, and a screenshot of the selected program will appear on your PowerPoint slide. Alternatively, click on the Screen Clipping option, and you will be able to select a part of your computer screen to snip and add to your slides.
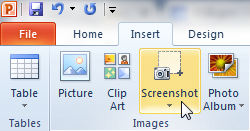
The Screenshot option on the Insert tab allows you to place content from your computer directly into your presentation.
Secret #5: Break It Up
You likely know how to insert a table in your PowerPoint, but did you know that you can break the table up into individual text boxes? This is a great feature when you don’t want to retype information but want to manipulate multiple pieces of text on a slide.
To start, select the table you want to break up, and press Ctrl + X (the keyboard shortcut for Cut) to cut the table from the slide. Don’t panic! It will be back.
Now, press Ctrl + Alt + V (the keyboard shortcut for Paste Special), and a dialog box will appear. Choose to paste the table back as a Picture (Enhanced Metafile). Next, select the table, and press Ctrl + Shift + G (the keyboard shortcut to group/un-group) to group the table. A dialogue box will appear, asking if you want to convert the image to a Microsoft Office drawing object. Click Yes. With the table still selected, press Ctrl + Shift + G for the second time to un-group the table. Now, you will see all the text and borders appear as separate text and content boxes for you to move separately.
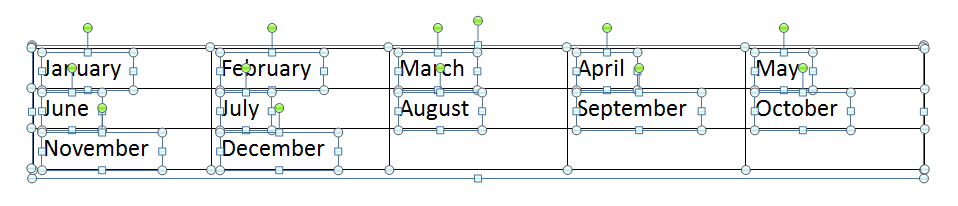
Break up a table in PowerPoint to move cell content separately.
Now, go forth, and wow the world with your newfound PowerPoint skills!
Resources:
http://www.thinkoutsidetheslide.com/ten-secrets-for-using-powerpoint-effectively/
http://www.pcmag.com/slideshow/story/328357/17-tricks-to-master-microsoft-powerpoint/1
Lacey Scully is part of the GovLoop Featured Blogger program, where we feature blog posts by government voices from all across the country (and world!). To see more Featured Blogger posts, click here.


Potential secret #5: don’t use PowerPoint.
I know what you mean, Joe. Sometimes PowerPoint just isn’t the way to go! I love new tools like Prezi that take presentations to a different level. I think PowerPoint is very “power”ful! Just needs to be used wisely… 🙂 Thanks for your comment!
Excellent tips. Now I just need to remember them.
Thanks, John! I agree – sometimes it’s hard to remember tips like these when you aren’t using them all the time. I like to bookmark resources and/or save info to Google Drive for future reference. Hope these will help you out in future PowerPoint presentation opportunities!
Wow. This is so useful. Thanks.
Thanks, Bob! I found these very useful too. My favorite was probably the pen tool/drawing directly on the slide. Kind of reminds me of how sportscasters draw on the TV screen during a game!
Great, doable tips. Thanks!
Thanks so much for your comment, Devorah! I love when something is “doable” too. It’s empowering!
Great tips! thanks!
Nice!
Thanks, Judith! Hope you can use these in the future!
Very helpful! Thanks for sharing these tricks.
Glad that you find them helpful, Diane! I’m always excited when I find a new trick for an application like PowerPoint that I feel like I’m very familiar with. Learning something new keeps things fresh!
Thank You So very much for sharing these Powerpoint extra tips & tools!!!!! 🙂
Thanks for your comment, Tracy! My pleasure. I love finding and sharing tips to make resources like PowerPoint work for me. Hope you are able to use these in the future!
Drawing on a slide DURING a presentation? I had no idea! Great tips, Lacey!
I know, right?!? I will need to be careful not to OVERuse that one. Thanks for your comment, Rob – appreciate it!