
I thought this to be a fitting post for all of the geeky ones here on GovLoop and was originally written for ryanerickson.com.
So you’re a prolific blogger of many things Coast Guard, social media, and other things- and an avid commenter all over the internet. You’re clearly one who gets around voicing your opinions on everything. But how do you capture all of your opinions and posts in one place? Furthermore how do get all of that information out to show everyone what your saying? It’s actually really easy… just make a pipe!
By using Yahoo! Pipes you can basically take all of the information on the internet and push it through a single pipe into a usable list. Better yet you can turn all of this information into an RSS feed to either read though an RSS reader or turn around and push it out to your favorite social media sites (that’s my next post on the subject). But before we delve into the social media pushing lets discuss and make a pipe just to show how easy it really is.
In this example I’m going to use already available RSS feeds from a few sites that I use or work with. For this I’m using the following four feeds to make into one piped feed:
- ryanerickson.com (WordPress): http://feeds.feedburner.com/ryanericksonblog
- blog.USNI.org (WordPress): http://blog.usni.org/?feed=rss2
- esoinfo.blogspot.com (Blogger): http://feeds2.feedburner.com/LantD5EsoInformationSite
- Disqus Comments from this site: http://ryanerickson.disqus.com/latest.rss
One: Head on over to Pipes.Yahoo.com and login, you’ll no doubt need a Yahoo! account to do so though. Once there and all signed in click on “Create a pipe” on the upper right area; do note that if you’re running IE6 as I do at work this won’t work… you’ll need to upgrade so it tells you.
 Two: Once you’re in the pipes ‘maker’ you’ll see a lot of options for you to play with on the left-hand side, go ahead and have a look around. However, for this little task we’ll only need to play with three tools (Fetch Feed, Filter, and Union)- the first one is the “Fetch Feed” under the ‘Sources’ list- drag it into the working area or click the plus icon to add it. If you’re on a slow connection you may have to wait a moment for all of the data to populate. Remember for this we’re going to use a total of four feeds, so click on the plus (+) sign next to URL to add spaces for more feeds. Next simply put your valid feeds into the spaces.
Once you have the feeds in there you may be presented with a warning sign (a triangle with an exclamation point, question mark, etc…) or some other sign- these can be ignored for the most part as the feed is still working. Sometimes pipes doesn’t like our feeds (do note though that the top of the “Fetch Feed” box should be blue to mean it’s working properly) but if your working on it it’ll be orange.
Notes:
- If you don’t know your feed or you’re unable to find it you can always try the “Feed Auto-Discover” tool; it’s basically the same process as above only you need only put the website URL and not it’s actual feed address.
- Also note that if you’re using feeds from differing services such as I am you’ll want to use different feed boxes and filters. This is because the rule options for all three of the example services is different and they don’t all show up when using one filter box- so for mine you’ll see I had to use three; one for WordPress, one for Blogger, and one for Disqus.
- See the screenshot at the bottom for the end result.
 Three: Click on the “Operators” menu on the left then the little plus icon next to the “Filter” operator. This will bring up a filter (I guess you wouldn’t have guessed that one ‘eh?) which will allow your pipes to decipher the differing attributes of the posts/comment. Once you connect your “Fetch Feed” to your “Filter” by way of dragging the little dot (which will make a dragable line) at the bottom of the feed box to the top of the filter box the filter will begin to updated itself with the different attributes it can filter for you… so just let it run for the few seconds or so until the “Updating…” logo is gone.
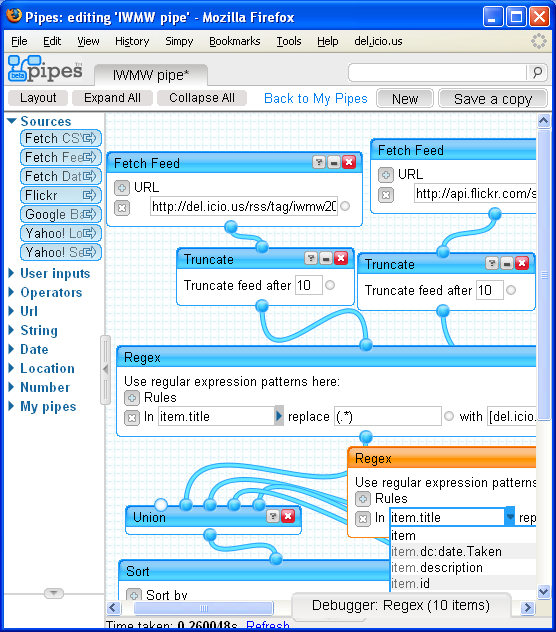
Four: Now that we have the filterable attributes we need to decide how we want to filter all the posts that are on the four feeds (three feed types, click on the picture here on the right for a closer view). Well as it turns out two of the three sites (2 of the 4 feeds) on my list are posted upon solely by me but the other two are from differing contributors or commenters. As such we’ll want to separate all of these posts by the author. Here are the attributes I used for the different services to pull only my posts/comments:
- WordPress: item.dc:creator
- Blogger: item.author.name
- Disqus: item.dc:creator.content
Also I found that you need to use your user/id name. For WordPress this is the name that is associated with your posts; in Blogger is the name associated with your Blogger Profile; and for Disqus it’s your login name. Again, be sure to click on and look at the picture below for a better view of the entire pipe layout.
Note: Remember we are looking to post by author in an effort to differentiate yourself from other contributors. You can also use other filtering options if you feel the need to drill deeper; you can just consider this as a stepping stone, see this picture for an example of pipes confusion.
 Five: Connect your “Filter” boxes to the “Union” to combine all of the filtered feeds. The “Union” can be found under the “Operators” selection, the same as the “Filter” was. It’s quite simple once its out there- just connect the three filters (in my case) to the top portion of the “Union,” and then connect the “Union” to the pre-made “Pipe Output” box. Sometime the pipe will auto generate (if so you’ll see the pipes logo at the bottom turning colors), but other times you have to hit the refresh link on the lower left. If all goes as planned you should see a list of your recent posts/comments show up (as on the right)
Six: We’re almost done. Now that the pipe has been built we need to save it and get a working feed out of it for our RSS readers or social media pushers (again, that’ll be my next post on the subject). So now that you’re pipe is up an running you’ll want to save it and give it a name. If you haven’t done so already go ahead and click save, you’ll then be prompted to give your pipe a name- do it and click save in that box. Now look at the top center of the page- you’ll see a new option that just became available: Run Pipe… Go ahead and click on it- a new screen/window/tab will open up.
Seven: Here’s where the final magic comes in. This is your pipe feed page (at least that’s what I call it)- you’ll see several different flavors of feeds in here. The one most of you are interested in is the actual RSS feed. To get this feed one only needs to click on the RSS icon/Get as RSS. Once you click on this you’ll be given a huge address to place into your favorite RSS reader- do remember that you need to take the whole address (all the way to the “&_render=rss” at the end) otherwise it won’t work. And just to be sure your feed is set up right enter the feed address you’re given into the Feed Validator– I only say this as I’ve gotten bum feeds once or twice.
And that’s about it- you’ve now turned four RSS feeds into one that’s extracting only your, or mine, data to show off or follow. As easy as this was though be forewarned not to place too many feeds into one pipe as it’ll start to act a little funny without proper filtering. Take for example this pipe that has 25+ feeds of the Coast Guard’s press release feeds in it- it acts wonky at times but it’s sometimes usable… go ahead and give it a try to see what I mean.
The next segment for this is how to use this feed, or any feed, and push it out to the most popular social media sites for your friends, followers, and potential followers to see.

Thoughts? Comments? Concerns? Let me know.
This post was originally written for ryanerickson.com.


Wow, this is really useful. Thanks for the great “help sheet.” I can see a lot of ways this could be useful to me and others!